Monthly Archives: April 2009

Tap This: Home Brewing Part 4, Moving to Secondary Fermentation

by CJ Mattiola

READ ALL 6 PARTS OF THE TAP THIS HOME BREWING GUIDE HERE

I am so excited to try this beer! I have a long way to go before it will be drinkable (at least 40 days). So meanwhile I started another batch, this time a blond summer ale that should actually be finished before this IPA because it does not take quite as long to mature. I figure I might as well keep the batches going so once one is ready, another will not be far behind.

About 3-5 days after the day of the boil, the primary fermentation stage is coming to an end. This can be noticed as the vigorous release of carbon dioxide through your airlock begins to slow down. At this point most of the sugars have been converted into alcohol and CO2. By the 6th day for most ales it is time to move your beer over to the secondary fermentation vessel. Beer usually stays in secondary for 10-20 additional days (sometimes longer depending on the type of beer) before bottling.

Why is it important to move to a secondary vessel and what is happening during this time? You could go ahead and bottle right away if you wanted, and you would still have beer, but it would be a young beer that is filled with debris made up of flakes of protein, dead yeast cells, and hops. Moving to secondary allows you to leave the sediment behind in the bottom of your primary fermentation vessel. During the time your beer spends in secondary the yeast will also further remove some undesirable flavor components. Most of the yeast remaining will fall out to the bottom of the vessel, the haze will begin to clear, and you will be left with a clear, bright, and much better beer that is ready to be carbonated.

Moving to your secondary fermentation vessel is the easy part. Here is how to do it:
1) Carefully move your Primary Fermentation vessel onto your kitchen counter or something at least 3 ft from the ground and let it sit for an hour or 2 to ensure debris settle to the bottom.

2) Sanitize your secondary fermentation vessel, airlock, and plastic hose. You can use another plastic bucket for secondary but it is very beneficial to use a glass carboy during secondary because you can see the beer. This is important because 10-20 days down the line you will want to check to see if the haze has cleared and glass allows you to see that.

Sanitizer:

Sanitized Carboy:

3) Attach the hose to the spigot on the bottom of your primary fermentation vessel and run the other end into your secondary vessel so that it snakes around the bottom. It is important to use a hose and to do it this way in order to prevent your beer from oxidizing.

Note: Oxidation is bad! It causes a stale and nasty flavor. It is cause by introducing oxygen to beer after fermentation usually by movement or heat. It happens a lot with imported beers during shipping and I am sure most everyone has experienced these off-putting flavors in some imports. You want to avoid as much agitation, and aeration as possible while moving to your secondary fermentation vessel.

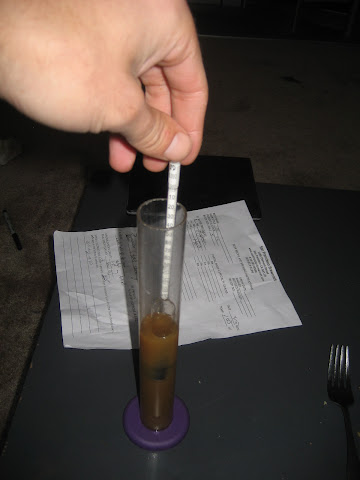
Also – it would not be a bad thing to take a sample of beer from the spigot before attaching the hose. Take the gravity to see how your beer is progressing as shown in the previous post, and taste it!

4) Next open up your spigot and let the beer gently and smoothly flow from the primary vessel to secondary. Remember to try to avoid oxidation. When it has all flowed out do not tilt the primary vessel to get more beer out because the goal here is to leave the sediment behind. Your spigot is an inch or so from the bottom and should let out just enough liquid to leave all the bad stuff behind. (see pictures and video at the top of the post)

Beer flowing:

Notice how it is still a little cloudy. A few weeks in here will clear it up:

5) Pull out the hose and stick the airlock in the top of your vessel.

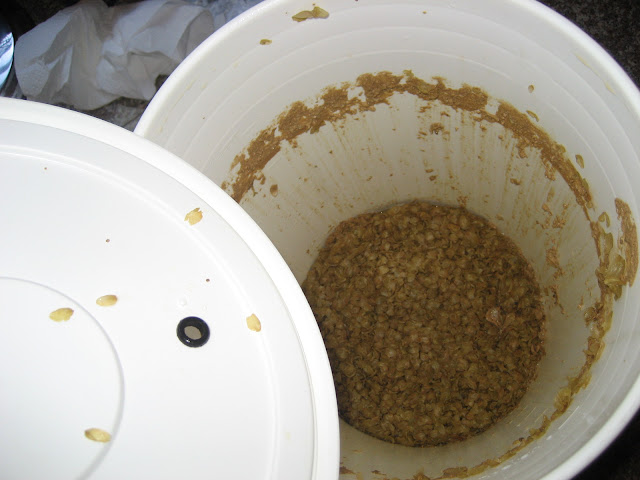
Inside the Primary Fermentation Vessel after emptying. Sediment made up of dead yeast, proteins, and hops (what you want to leave behind):

6) Move the vessel to a cool and dark place and avoid any agitation while you are waiting for things to settle. You will be ready to bottle in 10-20 days or as specified by your recipe. I like to keep a towel around my vessel to keep light out and to help regulate temperature.

The beer is getting closer and closer to being ready. You better start getting some bottles ready because you are going to need a bunch of them in a couple weeks. You can buy bottles but why do that when you can just buy beer, drink it, and save the bottles. Make sure you are getting beers with bottles that do not screw off at the top and you are good to go!

Collecting Bottles:

This beer will not be ready to bottle until around May 9th or so. It takes a little longer to mature then an average ale. Next post will be something random so stay tuned.

-CJ

Happy Hour: The Mint Julep

by Payman Bahmani

The first Saturday in May is a special time of year for many Americans, especially those south of the Mason-Dixon. The month of May is to fans of horse racing what March is to college hoops fans, because it means it’s time for the annual “Run for the Roses,” better known as the Kentucky Derby. With this year’s race only a few days away, it is only appropriate to dedicate today’s Happy Hour to the official drink of the Kentucky Derby, the Mint Julep.

Derived from the Persian word Golab (rosewater), the Julep is as much a symbol of American ingenuity in the art of inebriation as the exalted Sazerac. It also predates the Sazerac by at least half a century. The earliest written mention of the Mint Julep dates to 1803 when John Davis, a British tutor working in the South described the drink as “a dram of spirituous liquor that has mint steeped in it, taken by Virginians of a morning.”

As is expected, a drink of such vintage has been a source of vigorous debate regarding the finer points of its recipe and origin. To be sure, there is no one “original” Mint Julep recipe–more accurately stated, there is no way of knowing who’s recipe is the original. For example, Ted Saucier’s 1951 classic cocktail guide Bottoms Up features fifteen different Julep recipes, all from various noted Southern barmen. There’s even a debate over whether the mint should be crushed or not, with some contending that muddling the mint makes it a Mint Smash, not a Mint Julep. We shall leave that debate alone.

Modern Mint Julep recipes almost exclusively call for bourbon (the distinctive brand of American whiskey produced in Bourbon County, Kentucky), but this was not always the case. Early nineteenth century Mint Julep recipes called for either brandy, European or Canadian whiskey, and possibly even rum, as some historical evidence suggests the Julep entered the states in the late 18th century via New Orleans by way of the Caribbean, which of course is the dominion of rum.

Perhaps only after the production of American bourbon was refined did it begin to replace other spirits in Mint Julep recipes. But regardless of one’s “spiritual” position in this debate, few things are certain: bourbon was the spirit of choice in the Mint Juleps served in the inaugural run of the Kentucky Derby in 1875, so by the time the Mint Julep became the official drink of the Derby in 1938, bourbon had long made its mark (pun intended) as the go-to spirit in the recipe.

Mint Julep
10-12 torn mint leaves, plus a few sprigs for garnish
2 tsp simple syrup
3 oz bourbon (Bulleit bourbon is superb here)
Lots of crushed ice

Tools: muddler, straw (optional)

Glass: julep cup (pictured above)

Wet the outside of the julep cup with water and place it in the freezer. Once well chilled, carefully remove the cup from the freezer with a towel so as not to destroy any of the frost. Place the mint and simple syrup in the cup and using the muddler, gently crush the mint leaves. Fill the cup with crushed ice, add the bourbon, and give a gentle stir to distribute the mint. Pack with more crushed ice to the top, and garnish with the reserved mint sprigs.

The silver julep cup is the traditional way to serve and enjoy a Mint Julep. The hot and humid climate of the South made this metal vessel the perfect choice for extending the coldness of the drink as long as possible, especially since the drink was invented before there were any refrigerators. But julep cups are quite difficult to track down (not to mention expensive), so feel free to use a collins or highball glass (chilled the same way) instead, which have become the modern day substitutes.

While the Mint Julep is a fairly simple and easy drink to prepare, I caution against taking too casual an approach. While it’s tempting to cut a few corners, it is also the easiest way to make a mediocre and underwhelming Mint Julep. Trust me when I say that the extra care taken in assembling a good Mint Julep will reap rewards that far outweigh the value of the time and money expended in the venture. Now that’s a horse worth betting on. Cheers!

Come back every Wednesday for Paystyle’s weekly Happy Hour column.

Photography by Vanessa Bahmani

The Umami Reader, vol. 053: The Bacon Lance

by Kayoko Akabori

The only thing you need to see this week, via Mel. Wait for the vegetarian version.

The Umami Reader brings you the freshest food news every Tuesday, however outdated it may be. Please email links to what you’re reading to umamimart@gmail.com. Follow UM on Twitter for more 24/7.

Chocolate Curl Cereal Challenge

by Yoko Kumano


I am shocked that I haven’t posted anything on cereal on Umamimart yet. Ever since living in Tokyo, I have not been able to live out the fantasies that I have as a self-proclaimed cereal addict. As a kid, I would always request 4-packs of Honey Bunches of Oats when my mother made a Costco (then Price Club) run. I also cried tears of joy in college when I would drive to Trader Joe’s and stock up on bags of Vanilla Almond Granola. And I swear I was the happiest woman alive when faced with the vast row of bulk cereal and granola bins at the Berkeley Bowl.

So I was thrilled when I found a whole new selection of cereal available to me during my vacation in Italy. My first stop in Italy was Rome where I met up with my friend Jade (introduced to me by Kayoko). We stayed at Anni 50, a wonderful bed and breakfast run by an amazingly warm and hip couple Norma and Marco. Every morning we were greeted with delicious breads and foods. This is where my love affair with Italian cereal began. For the first two days Norma served us a type of chocolate curl cereal in a glass jar. On the first morning, Jade and I had gnawed our way through a substantial amount. It had just the right consistency and it was really chocolatey. Coco the monkey has nothing on these curls.

I decided I must find these at a supermarket.

My first box was purchased at Conad in Florence, a supermarket with its own house brand. There I found Petali Di Mais al Cacao. Since it was made by Conad, this box (375 grams) was very affordable at 2.05 euros.


Petali Di Mais was delicious. Although “chalky” doesn’t really conjure up especially appetizing feelings, it was very appetizing in the context of these Petali Di Mais. The chalky crunch was so satisfying that I went through half a box while I was sitting at an internet cafe for one hour. It’s a good thing I had enough water to sustain the constant box-grazing.


In addition to providing a satisfyingly muted crunch, the chalkiness also showcased the chocolate flavor of the product. Since it wasn’t glazed with a layer of sugar, there was nothing to get in the way of my contact with the chocolatey taste. Petali Di Mais was quickly devoured and the empty box found a nice home in my hotel trash bin the next morning when I checked out. Lifespan: 1.5 days.


Anxious to compare and contrast, my next chocolate curl cereal purchase was Barilla’s Pan di Stella Cereali. This type came in a bag (300 grams) and set me back 2.50 euros. The packaging seemed more sophisticated than the Conad version and the price reflected it.


Although the packaging made me feel more like my age, I was not very impressed by Barilla’s version of chocolate curl cereal. It had a very thin glaze of sugar to make it look shiny. The sugar coating made it too crunchy and interfered with the taste, making the overall experience too sweet.


To further unnecessarily complicate things, there were little star rice-puffs in it. I didn’t really find this as an asset to the cereal. I don’t really know if these were thrown in for aesthetic reasons or for diffusing the sweetness of the chocolate curls. Either way, I felt they were just a distraction, and ultimately provided for a dissappointing finish (when I reached bottom and found that most of the stars had fallen through the curl cracks and I was stuck eating stars only). Pan di Stella Cereali was good, but not good enough to avoid lasting me until the end of my trip. Lifespan: 3.5 days.


You’ve got nothing on these curls, buddy…

Meatless Monday FAIL

by Kayoko Akabori

My Meatless Monday:

Breakfast: Cereal and a banana.

Lunch: Cold udon noodles and sauteed onions and mushrooms.

6pm: I head to the Oakland airport where I gotta pick up Stacy.
Driving down the 880, shit I need to pee. Drive for 20 minutes.
Oh, there’s an In-n-Out! Cleanest bathroom off the highway!
Brake, cut off car in the next lane, skid towards the exit.


I really did just come in to use the loo… but you can guess what comes next:


The Meatless Monday gods are punishing me right now with hardcore heartburn. Shoulda listened to Paystyle all along. Hope ya’ll did better than I did. I’ll try again next Monday!

Tap This: Home Brewing Part 3, Fermentation

by CJ Mattiola

READ ALL 6 PARTS OF THE TAP THIS HOME BREWING GUIDE HERE

In the last post we went through the entire boil, pitched the yeast and moved our wart to the primary fermentation vessel. Within a day or so you should begin to notice the beginning of the fermentation process. As the yeast converts sugars into CO2 and Alcohol, pressure will build in your fermentation vessel and some of the CO2 will “burp” out of your airlock as seen in the little video above. Beer is being made! Great success!

Now it’s time to get a little nerdy… One thing I did not mention is that a sample of the beer should be taken just before pitching the yeast in order to measure specific gravity (SG) with a hydrometer.

A hydrometer is an instrument that measures the density of a liquid in relation to water. This is done by floating the hydrometer in the liquid and reading how deep it sinks in by looking at where the scale on the top just breaks out of the liquid. Water has a specific gravity of 1.0.

Hydrometer:

Why is this important to the brewing process? At the end of the boil you have a liquid solution that is much denser than water because of all the dissolved malt. A measurement should be taken just before pitching the yeast. This measurement is called the Original Gravity (OG). While the OG of beer can range from about 1.02 to 1.16 (meaning 1.02 – 1.16 x denser than water), you will always be aiming at a much more narrow target that is provided by your recipe or at least confined by the general guidelines for the style of beer you are making.

Hydrometer floating at 1.068:

Now that you have both an OG and an FG reading, you can calculate your beers alcohol content! This is done by following this simple equation.

(Original Gravity – Final Gravity) x 129 = Alcohol by Volume%

My OG measurement came to 1.068 while the temperature of the beer was around 75 degrees. Since the hydrometer is calibrated for 60 degrees I have to adjust by about 2 points (this will be displayed in a chart that comes with your hydrometer) making my actual OG around 1.07. This is right around where I wanted to be for my IPA as that style ranges from 1.055 to 1.07. I do not have my final gravity reading yet because my beer is still racked, however it should come out to around 1.016. So the calculation would work out as follows:

(1.07 – 1.016) X 129 = 6.96% ABV

It is kind of fun to take these readings throughout the process because you get to see how your beer is coming along and how your yeast is performing. It is also great to drink your samples after, which will immediately bring all your senses back to the day of the boil. Moving to secondary fermentation vessel is next- it is tasting awesome so far and I cannot wait until it is done!

-CJ

Fridgin’ Out: Garden Delights

by Kayoko Akabori

Went over to Chuchoter‘s place in Oakland the other night- she and her husband Tom have been super hustling with work and so I don’t get to see them much these days. But I was in the area and when I called her, she mentioned going out to the famous Fenton’s for ice cream, so I couldn’t resist tagging along.

After we got back, I had a few hours to kill before I had to get to a party in SF, so I started trolling through their fridge to make them dinner. They both had work to do (on a Sunday!) and don’t have much time in general to cook these days.

Her wonderful mama had brought over a TON of vegetables over the weekend from Monterey Market, a Berkeley grocer long run by a Japanese-American family selling produce by local farms and purveyors at reasonable prices. Stacy asked me to please do something with all the vegetables in her fridge- can’t turn down such an offer!

When I opened the fridge I nearly peed my pants in excitement. It was like a treasure trove of garden delights- gorgeous vegetables and fruits were overflowing from the shelves and bins, begging to cook with them. “Kayoko! Kayoko! Pick me! Pick me!” I seriously heard them calling for me, I swear.

When I say overflowing, I’m not joking. The bins were chock full of greens, golds and reds, and all the vegetables took over the middle shelf as well. Brussel sprouts, basil, cilantro, green onions, cucumber, arugula, two kinds of lettuce, radishes, broccoli… it just didn’t end.


I started just picking out bags of vegetables one by one. This was seriously dreamy- like being at the farmer’s market but not actually having to go. Don’t get me wrong, I love going to the market, but don’t you wish sometime that you woke up and dreaded having to go to the store? Yah you have.

So I rolled up my sleeves, shooed Chuchoter and Tom out of the kitchen and got to work. They have a fridge door full of condiments (mustards, Annie’s dressings, ketchup, the basics), but I just wanted to taste the bounty of spring and keep extra sauces to a minimum.

First up, roasted vegetables- yellow peppers, zucchini, asparagus, onion.

Preheat oven to 375Ëš. Chop up garlic, zucchini and peppers. Drizzle olive oil over all, and mix around with your hands with salt and ground pepper. Put in oven for 30 minutes.

I was looking through Chuchoter’s Chez Panisse Vegetable cookbook. It’s awesome!! I must get myself a copy. Anyhow, I was looking through the onion section and decided to make the very simple Spicy Roasted Onions (can’t find the exact recipe online but that’s the gist).

Just cut yellow onion about 1/4 inch thick, drizzle olive oil over it, salt and pepper. Put in 375Ëš oven for 30 minutes.

While all that was in the oven, I started making salad. What kind of lettuce, you ask? Oh, red leaf, romaine with a sprinkling of arugula- you know, whatevers in the fridge. Uhhh… DREAMY. Added chopped red onions and tomatoes too.

Chuchoter, bless her soul, also had all these grains in her pantry, so we decided to make quinoa. Neither of us had ever attempted this before, so it was an adventure. Did you know you have to toast the quinoa before adding water to it? Not sure which recipe Chuchoter used, but that’s what it had us do.

Took the zucchini and peppers out, mixed it about a little, and put it back in the oven. After about 10 minutes, I took it out again and added the asparagus on top, drizzled more oil over it, and put it all in with the oven on broil for 10 minutes.

While that’s happening, we worked on the quinoa (add water and slowly simmer) and marinate the onions in a olive oil/vinegar/red pepper flake concoction. Let’s say it was 2 parts oil, 1 part vinegar/ quarter teaspoon of red pepper. The recipe called for sherry vinegar, but all we had was balsamic, which was fine. Mix all this together and drizzle over the onions and let it sit for 20 minutes.

By the time the asparagus are roasted al dente (about 10 minutes in the broiler, but keep it in until it cooks to your liking), everything should be ready to go. Here’s our spread- DELIGHTFUL!!!

This had been a scorching day where it got to be an uncharacteristic 90Ëš out- in April! A light vegetable dinner was exactly what the weather called for. We added the quinoa into the vegetables and lets it soak up all the juices. (I’m still trying to master the art of roasting peppers, as it tends to get watery after roasting. Anyone have any advice?)

The onions were a huge hit- the vinegar added a tart freshness to the sweet roasted onions. Also, the tomatoes were super sweet and totally reminded me of Italy. I don’t think I’ve ever had tomatoes that good in the States.

Of course I found some Meyer lemons rolling around in the fridge, so we sliced those up and squeezed it over everything. All in all, this was a healthy, impromptu home-cooked meal that all of us desperately had been craving. Thanks to the Chuchoter and Tom for letting me invade your fridge!

Please excuse the poor quality of the photos, all I had was the iPhone! What’s hiding out in the back of your fridge? To feature your fridge on UM’s Fridgin’ Out, email umamimart@gmail.com

The Ultimate Breakfast of Champions: Wally Waffle’s Chicken ‘n Waffles

by Kayoko Akabori

Wally Waffle has been an Akron institution for as long as I can remember, but for some reason, I have only started to frequent it in the past few years. The menu focuses on breakfast items, and I guess from the name of the establishment, it’s the waffles that are its specialty, but they also serve everything from gigantic omelets to club sandwiches, and dessert classics like waffles with 5 scoops of ice cream on top.

The only downside to the joint is that it has very odd hours and it’s hard to go there when you have a craving because it’ll be closed. You have to time it so you’re either unemployed or skip work, or are fortunate to work in the area so you can go over there
and get your bfast on.

This was my first time having chicken and waffles so I honestly have nothing to compare it to, but I went with a very knowledgeable friend. Also, I’ve had fried chicken and waffles separately, so it wasn’t hard to tell that this was A-MAZING!

As the sign says, 3 pieces of fried chicken (breast, thigh, and drumstick) are served on top of a standard 4-triangles-making-up-a-dinner-plate-sized waffle. Sizzurp comes in a bottle to use as you wish.

Okay, let me tell you, consuming this chicken was like dying — my life flashed before my eyes: me being born, me losing my first tooth, me getting an awful perm, me taking ballet in college, me parallel parking outside of Wally Waffle’s… Each chicken piece was covered in an extremely thick batter coating which was extremely crispy. It was so crispy that whether you bit into it or cut it with a knife, your incision was clean — no rubbery bits and no tearing off more than you could chew at once. It wasn’t so crispy that it broke off in your hands, it was juuuuuusssst rrrrriiiigggghhhht.

Inside, the meat was well-cooked, tender, and moist. It was a pity there wasn’t more, but seriously, I could eat that crispy coating and chicken skin all day for the rest of my life. Adding sickeningly sweet syrup contrasts with the savory salty taste of the chicken, which is what was awesome. Flavor explosion!

The waffle on the bottom was a nice contrast. Slightly sweet compared to the chicken, but added that soft texture that went well with the extreme crispiness of the chicken. A buttery pillow which soaks in the syrup and fat from the chicken (and possibly the optional butter ball that comes on the plate), it was going straight to my thighs but do you know what? I WANTED MORE.

Speculation was raised as to how the chicken was prepared. Lard? Crisco? Double fried? Chicken that was fried while frozen? Various combinations of these? There was definitely something very MAGICAL or WRONG done to these chicken parts to make them taste like this.

After this feast, I went on to my friend’s house to eat pound cake with strawberries and neopolitan ice cream. Yes, this was all before 2:30PM, and yes, I had eaten breakfast, and yes, I did go on to eat dinner. And no, I am not in a food or diabetic coma right now.

Wally Waffle (Downtown)
338 Locust Street
Akron, Ohio
330-762-3388

Wally Waffle (Tallmadge)
750 Darrow Road
Akron, Ohio 330-633-7400

Wally Waffle (Barberton)
Opening Soon!

*More Wally Waffle pics by Thomas D’Invilliers here.

Clio at the James Beard House

by Erin Gleeson

A couple weeks ago, Jonathan and I took his Grandmother to dinner at the James Beard House for her birthday. We had a deliciously good time tasting the culinary delights from the chefs at Boston’s Clio. The next time I’m in Boston, I’ll definitely be stopping by!

Dinner Menu & Wine Pairings:

Smoking Salmon with Apple Cider, Cucumber Vinegar, Mustard Sorbet, and Szechwan Pepper Smoke
Merry Edwards Sauvignon Blanc 2007


Atlantic Skate Wing with Southeast Asian Barbecue Sauce, Coconut, Green Papaya, and Peanuts
Loimer Kamptal Riesling 2007


Lacquered Foie Gras with Buttermilk, Apricots, and Barrel-Aged Whiskey
Château La Rame Sainte-Croix-du-Mont 2002


New Zealand Venison Saddle with Pistachio, Preserved Gage Plums, Dandelion Greens, and Caramelized Salsify
Bodegas Ateca Atteca 2007


Frozen Banana Milk with Tamarind, Vanilla, Macadamia Nut, and Lime
Dow’s Fine White Port NV


Hors d’Å“uvres served during cocktail hour before dinner:
Clio Tacos with Tomato Confit


Oysters with Seaweed, Paddlefish Caviar, and Silver Pearls


Sweet White Shrimp with Cocktail Sauce Powder

Chef Grundy


Chef Oringer plating dessert


Jonathan and Audrey listening to the chefs speak about what they prepared after dinner


Ken Oringer, Alec Riveros, Andrés Julian Grundy

Modern French American from Ken Oringer’s Clio in Boston
Chef: Andrés Julian Grundy
Wine pairings by General Manager/Wine Director Alec Riveros

photos by erin gleeson

Happy Hour: Jalapeno-Pear Caipiroska

by Payman Bahmani


For Happy Hour this week I’ve created another cocktail for you that’ll help you get your spring on! I call it the Jalapeno-Pear Caipiroska. The Jalaheehowhatyousay? Is that Russian you ask? Well, yes and no. Read on my friends.

If you’ve ever had a Caipirinha then you’re halfway there. If you haven’t then you need to drop everything immediately (but first finish reading this column) and find your local churrascaria, or simply follow the hyperlinked recipe in the prior sentence, and have one really soon!

The Caipirinha is considered the national cocktail of Brazil–a simple and delicious warm weather potion comprised of muddled lime and sugar, ice, and Brazil’s national spirit, cachaça. Somewhere down the line Brazilians came up with the Caipiroska by replacing the cachaca with vodka (hence the cutesy Russian sounding name), probably as a means of appealing to cachaca-averse tourists. And I must say that unlike most compromises, this is not a bad one, especially if you’ve run out of cachaca (like I did)–which is how I came to create the Jalapeno-Pear Caipiroska. Necessity is indeed the mother of invention.

Jalapeno-Pear Caipiroska
2 oz. Absolut Pears vodka
1 oz. honey syrup
1 lime, quartered
2-3 jalapeno slices
ice

Tools: cocktail shaker, strainer, muddler

Glass: rocks glass (aka old fashioned glass)

Muddle (mash together) the lime and jalapeno in the shaker. Add the remaining ingredients and shake well. Strain into a rocks glass filled with ice and enjoy. You can add a jalapeno for garnish like I did if you wish. Also, depending on your fortitude, you can adjust the amount of jalapeno you use. Personally I like more than the amount given in the recipe, but I have a much higher heat tolerance than most others, so a couple of slices should be enough to give most people a good spicy kick without inducing regret.

I must tell you that the combination of heat, honey, pear, and lime, is just sublime. This is a very easy drink to prepare with only a few ingredients, and if you’re already a fan of Caipirinhas, or if you enjoy a bit of spice in your cocktails, I highly recommend this one. You can also check out past spicy cocktail concoctions here. Three cheers for the Russian Brazilians!

Come back every Wednesday for Paystyle’s weekly Happy Hour column.

Photography by Vanessa Bahmani.